The making of stone carving 'Feedback Loop'.
It's been too long since I made a stone sculpture so it was great to chance to work on a new piece. In case anyone's interested I thought I'd give a quick look at how I go about it.

Tools of the trade
I hand-carve, which makes it slow work but whilst my wrists can still take it, I enjoy the process. I've nothing against pneumatic chisels and I'm certainly not ruling it out in future but for now it's mallets all the way!
So, from apart from the gloves, dust mask and safety glasses, the tools are (from left to right):
Mallets in different weights (the big fella for knocking chunks off and then using lighter mallets as you refine the piece).
Next come the various chisels, the first being a wonderful point chisel which was forged for me by hand by my talented friend, Steve Cairney. This is used to rough out the surface of the stone. Next are the claw chisels which are used to remove the peaks and troughs left from the previously used tools and to refine the shape. The rest of the chisels are used for detailing and smoothing.
The big file is called a rasp. This smooths the shape further.
Finally, the small files on the right are rifflers. These come in various shapes and allow you to define and smooth out awkward areas that you'd struggle to reach with any other tool.

For those at the back, here's a block of stone.
For this piece I started with a nice block of Portland Stone from the Jurassic Coast in Dorset. Much-loved by stone carvers, it's a limestone with the excellent attributes of being able to withstand the elements if placed outside yet it's also a reasonably soft and reliable stone to carve.
I've marked out the rough idea with an oil pastel (ok, it was a crayon) so it's time to start carving.

Nice curtains. This isn't the front room - they're a seemingly futile attempt to keep dust levels down on my shelves.
Using the point chisel I've defined the shape (see the top right side) and then used a claw chisel to cut deeper into the stone and shape the corner. I've smoothed it with the rasp to get a better idea of the form.

Chip off the old block.
Then it's a case of just keep going. The top has been roughed-out and I'm moving down a side face.

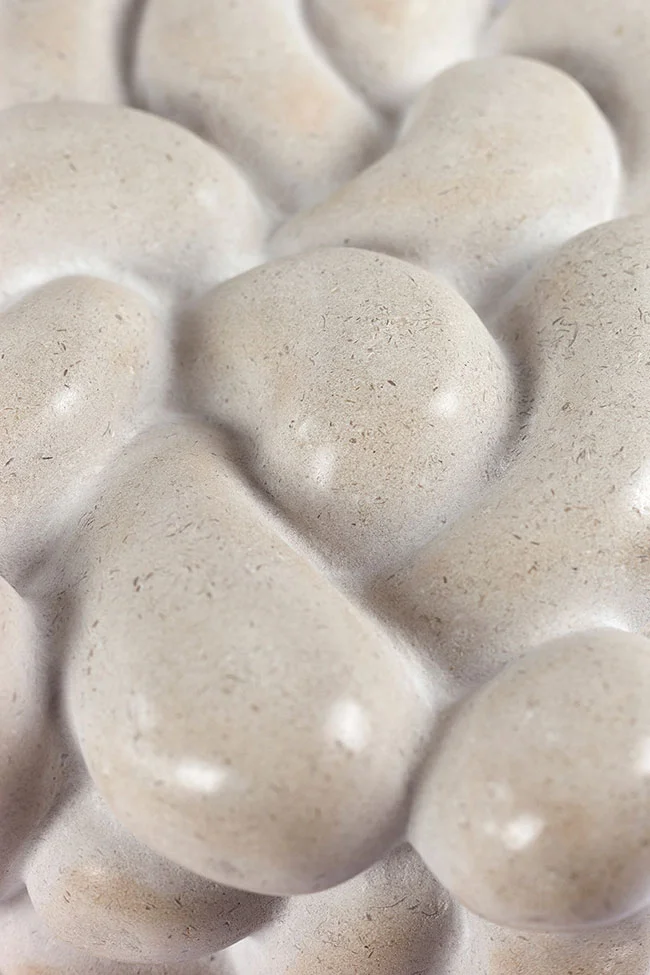
You can see the marks made by the claw chisel here. The teeth create these ridged marks which have been smoothed down with rasp and rifllers on the shapes above (which Julia calls Wotsits).

The stone is supported on a sturdy workbench with sandbags. These are just the legs of an old pair of jeans filled with sand. Obviously I kept the rest for cropped denim shorts. These also absorb the impact of the hammering, reducing the risk of fracturing the stone (the sandbags, not the shorts).

It's messy work.
Now the actual carving of the piece is complete it would be nice to think the most time consuming part is done. Alas, the most boring part takes the longest: sanding. This isn't always necessary as some pieces may look best left unsanded but I like the contrast between the smooth polished areas which brings out the beauty of the stone with it's fragments of shell and fossils and the rougher, matt areas of unpolished stone.

This requires plenty of water and diamond sanding pads which work just like sandpaper, working through various grits until a smooth, shiny finish is achieved. This takes forever and is a test of patience as much as elbow grease.

A couple of softnesses of buffing wheel and polishing compounds add a nice finish, bringing out the grain of the stone.
Finally a layer of wax is applied and buffed by hand to complete the sculpture.


The cup is to give you an idea of scale. It's not full of gin or anything.
Here's a clip of the carving process as a timelapse. It was taken over about 4 hours until my phone ran out of battery! Thanks for reading this far. Hope you enjoyed it.